This post contains affiliate links. If you buy through them, we earn a small commission at no extra cost to you.
Most people who add a second monitor say the same thing: they wish they’d done it sooner. One screen for active work, one for everything else — email, Slack, documentation, a reference browser tab. You stop alt-tabbing constantly. Context stays intact when you switch tasks. The mental overhead of managing open windows drops noticeably.
The setup is not complicated, but there’s a right order. Get cable compatibility wrong and nothing works. Get display settings wrong and you end up with two cloned screens instead of an extended desktop. Get the ergonomics wrong and you’ll have neck strain within a week.
This guide covers the full process from first cable to final configuration. Short on time? Two Dell P2425H monitors on a VIVO dual stand, connected via HDMI or DisplayPort, covers most home office setups for under $350 total.
Step 1: Audit Your Video Output Ports
Before buying anything, identify the video output ports your computer has. This determines which cables you need and whether you need a dock.
Common port combinations:
| Computer Type | Typical Ports | Dual Monitor Feasibility |
|---|---|---|
| Windows desktop | HDMI + DisplayPort (GPU) | Straightforward — no adapter needed |
| Windows laptop (modern) | Thunderbolt 4 + HDMI | Works with one adapter or a dock |
| MacBook Pro M4 | 3x Thunderbolt 4 | Supports two external displays natively |
| MacBook Air M4 | 2x Thunderbolt 4 | Supports two external displays in clamshell mode |
| MacBook Air M1/M2 | 2x Thunderbolt/USB-4 | Only one external display natively — requires DisplayLink dock for two |
| MacBook Pro M1/M2 Pro/Max | Thunderbolt 4 + HDMI | Supports two external displays natively |
Each external display needs its own dedicated video signal path. HDMI and DisplayPort are the most common monitor inputs. USB-C can carry video, but only if the port supports DisplayPort Alt Mode or is a Thunderbolt port — not all USB-C ports do this.
The laptop caveat: Most standard USB-C ports without Thunderbolt drive one external display. A Thunderbolt dock adds multiple display outputs from one cable connection. M1 and M2 MacBook Air users specifically need a dock with a DisplayLink chip to drive two external monitors — Apple’s driver limits the native controller to one external display on those machines.
Step 2: Choose Your Cables
DisplayPort: Best for desktop setups with a dedicated GPU. Handles 4K@144Hz, supports MST daisy-chaining on compatible monitors, and carries more bandwidth than any other common display connector. Use DisplayPort between GPU and monitors whenever both support it.
HDMI: Universally available. HDMI 2.0 handles 4K@60Hz. HDMI 2.1 handles 4K@120Hz. Right choice when monitors lack DisplayPort, or when one display is a TV.
USB-C to DisplayPort: The correct adapter for connecting a modern laptop to a DisplayPort monitor. The Anker adapter below handles 4K@60Hz with Thunderbolt 3 and 4 ports. Buy one per DisplayPort monitor that lacks a native USB-C input.
USB-C to HDMI: Works for 1080p and 1440p at 60Hz. At 4K, most adapters cap at 30Hz — get a USB-C to HDMI 2.1 adapter if you need 4K@60Hz over HDMI specifically.
What to avoid: HDMI splitters. A splitter clones one signal to two displays — both screens show identical content. That is not a dual monitor extended desktop setup. Splitters are for presentations, not productivity.
Step 3: Connect and Power Your Monitors
- Power off your computer
- Connect Display 1 via the first cable (HDMI or DisplayPort) to your GPU or laptop
- Connect Display 2 via the second cable to the second output
- Power on both monitors, then power on your computer
- If using a dock, connect the dock to your laptop first, then connect both monitors to the dock
If one monitor isn’t detected: Check that cables are fully seated at both ends. If using an adapter, try a different USB-C port — not every port on the same laptop supports video output. Then move to display settings in Step 4.
Step 4: Configure Display Settings
Windows 11
- Right-click the desktop → Display settings
- Both monitors appear as numbered rectangles. If only one shows, click Detect
- Drag the rectangles to match your physical arrangement — which monitor is physically left, which is right
- Set Display mode to Extend these displays (not Duplicate)
- Select your primary monitor and check Make this my main display
- Set the correct resolution and refresh rate per monitor
- Click Apply, then Keep changes
Scale: Different-sized monitors at different resolutions need independent Scale settings. A 24” FHD next to a 27” 1440p typically needs 100% and 125-150% respectively to match visual element sizes between screens.
macOS (Sequoia and later)
- Go to System Settings → Displays
- Click the Arrange tab
- Drag display rectangles to match physical placement
- Drag the white menu bar indicator to your primary monitor
- Verify each display is at native resolution and correct refresh rate
Mirror vs. extend: If the second display shows a mirrored desktop, hold the Option key while clicking Arrangement and uncheck Mirror Displays.
Step 5: Ergonomic Positioning
The most common setup mistake: placing both monitors exactly as you’d position a single display, then pushing them to the sides. This forces constant head rotation and creates neck strain within weeks.
Equal primary/secondary split (most common): Both monitors centered in front of you, with the seam between them directly ahead. Head turns 15-20 degrees to each side. Right for workflows where both screens get similar active use — code on one, documentation on the other.
Primary/reference split: Main monitor directly ahead. Secondary monitor to one side at a 30-degree angle toward you. Right for setups where you glance at the secondary display (Slack, email, dashboards) but do primary work on one screen. Reduces the head rotation required for secondary glances.
Height: Top of both monitors at or slightly below eye level. Tops above your eyes means looking up all day, which compresses the cervical spine over time. Monitor arms make independent height adjustment easy per display.
Distance: Both monitors at roughly arm’s length (20-30 inches from eyes). If one sits farther due to a corner desk layout, increase that monitor’s font size or resolution scale to compensate for the distance.
Equipment You’ll Need
These are the key components for a reliable dual monitor setup. Mix and match based on budget and existing gear.
Recommended Monitor for a Matched Pair

Dell P2425H 24-Inch FHD Monitor
Pros
- IPS panel with anti-glare coating delivers consistent color from any desk angle — no washout when you tilt or view from the side in side-by-side configurations
- 100Hz refresh rate makes document scrolling and window dragging noticeably cleaner than the 60Hz panels most office monitors shipped with two years ago
- Height, tilt, swivel, and pivot all adjust on the stock stand — full ergonomic dial-in before deciding whether a monitor arm is worth adding
- DisplayPort 1.4 output enables daisy-chaining on capable setups and carries the full 1080p signal at 100Hz, more reliable than HDMI for dual-monitor laptop configurations
- Buying two for a matched pair costs $280-$340 total — well under a single premium ultrawide, with two independently adjustable panels
Cons
- 1080p on a 24-inch panel shows its pixel density limits compared to 1440p at the same size — text looks noticeably softer for all-day reading of documents or code
- Built-in USB hub is USB-A only with no USB-C port — a separate adapter or dock is still required for laptops that charge via USB-C
- No USB-C video input — connecting a USB-C-only laptop requires an adapter, adding a link to the cable chain for anyone expecting a single-cable desk
The Dell P2425H is the practical answer to “what should I buy a second one of?” IPS panel, 100Hz, full stand adjustments, and DisplayPort at $140-$170 each. Two of these total $280-$340 — competitive with many single premium ultrawides, with two independently adjustable panels and twice the workspace. The 3-year Dell warranty on both units is a meaningful bonus at this price range.
Best for: Anyone starting a dual monitor setup from scratch who wants matched screens without spending $400+.
Skip if: You already have a high-resolution primary monitor (1440p or 4K) and want the second screen to match — the 1080p resolution will look noticeably softer by comparison.
Budget Dual Monitor Stand

VIVO Dual Monitor Desk Mount Stand
Pros
- Under $40 for a dual monitor arm removes both monitors from their factory stands, reclaims 8-12 inches of desk depth per display, and raises screens to proper eye level
- Heavy duty steel construction holds up at full extension over years of daily use — no wobble or creep when loaded with two monitors within weight spec
- C-clamp and grommet mounting both included — C-clamp installs in five minutes, grommet mount works for desks with existing cable holes or thick surfaces clamps cannot grip
- Built-in cable routing channels keep power and display cables organized between monitor and desk surface
Cons
- Fixed-joint arms require a hex key to reposition — not a smooth one-hand push like gas-spring arms; monitors stay where you set them until you loosen the bolts
- Maximum 27-inch monitor support adequate for most setups, but weight rating drops for heavier monitors above 20 lbs — verify your specific monitor weight before ordering
- At full extension with two heavier monitors, lighter desks experience more surface flex than with premium arms that distribute load better
The VIVO STAND-V002 is not a premium product. Arms require tools to reposition, and build quality shows at the sub-$40 price. But for a desk where dual monitors stay in a fixed position once configured, it works. The real value is straightforward: removing both factory stands reclaims 8-12 inches of desk depth per monitor and raises both screens to a proper ergonomic height, all for less than most premium brands charge for a single arm.
Best for: Fixed-position desks on a budget. Set it once, leave it.
Skip if: You adjust monitor position throughout the day or switch between seated and standing positions regularly.
Premium Dual Monitor Arm
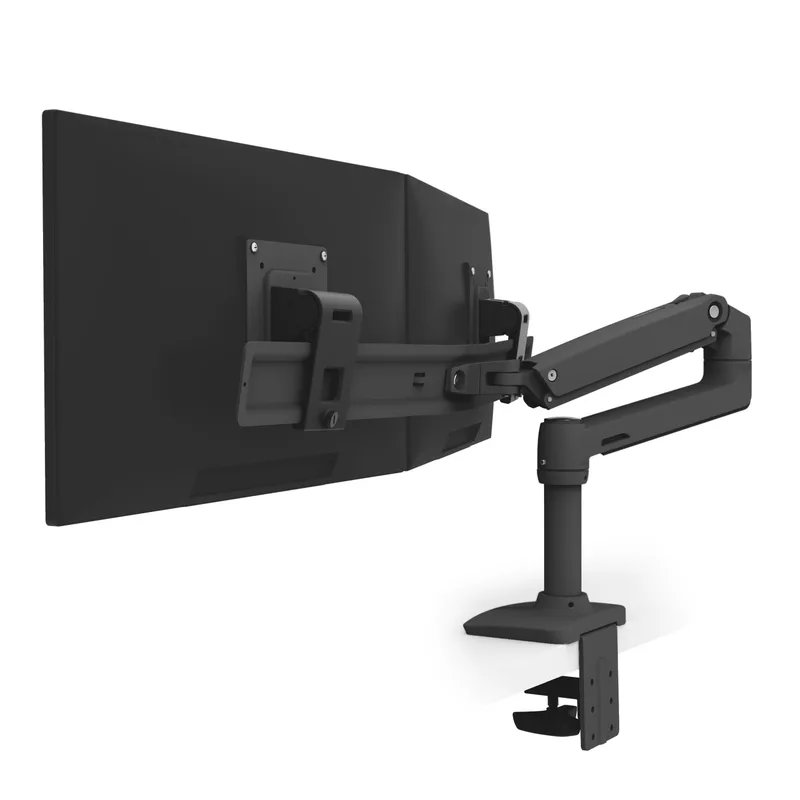
Ergotron LX Dual Monitor Arm
Pros
- Constant Force friction mechanism holds both monitors exactly where you place them without tools — lift, angle, and rotate each arm independently and it stays, useful when adjusting for glare or reframing a webcam mid-call
- Internal cable channels route all display cables through the arm housing — nothing visible between monitor and desk, the main reason this costs three times more than budget alternatives
- Full six-axis movement per arm (tilt, swivel, rotate, extend/retract) supports portrait-landscape mixed setups, angled primary/secondary arrangements, or matched side-by-side at any height
- Friction joints maintain calibrated resistance over years of daily repositioning — budget arms loosen progressively over months of use, this one holds
Cons
- At $175-$215, this arm costs more than many budget monitors it will hold — buying two budget monitors plus this arm can consume the entire dual monitor budget
- 27-inch maximum per arm is a hard limit — will not reliably hold 32-inch monitors; Ergotron's LX Vertical Stacking Arm handles larger displays
- Installation involves desk clamping and routing cables through the arm — first-time setup takes 20-30 minutes versus 5 minutes for a simple stand swap
The Ergotron LX is right if you want a setup that stays exactly where you put it, looks clean, and never needs a toolkit to adjust. The Constant Force mechanism makes one-handed repositioning smooth — minor until you’re adjusting for window glare, reframing around a video call camera, or changing height between sitting and standing throughout the day.
Best for: Any desk used daily where monitor position changes throughout the day. Also the right choice when cable cleanliness matters to the overall setup aesthetic.
Skip if: Monitors will sit in a fixed position. The VIVO saves $150 for identical functionality in that scenario.
USB-C to DisplayPort Adapter for Laptop Users
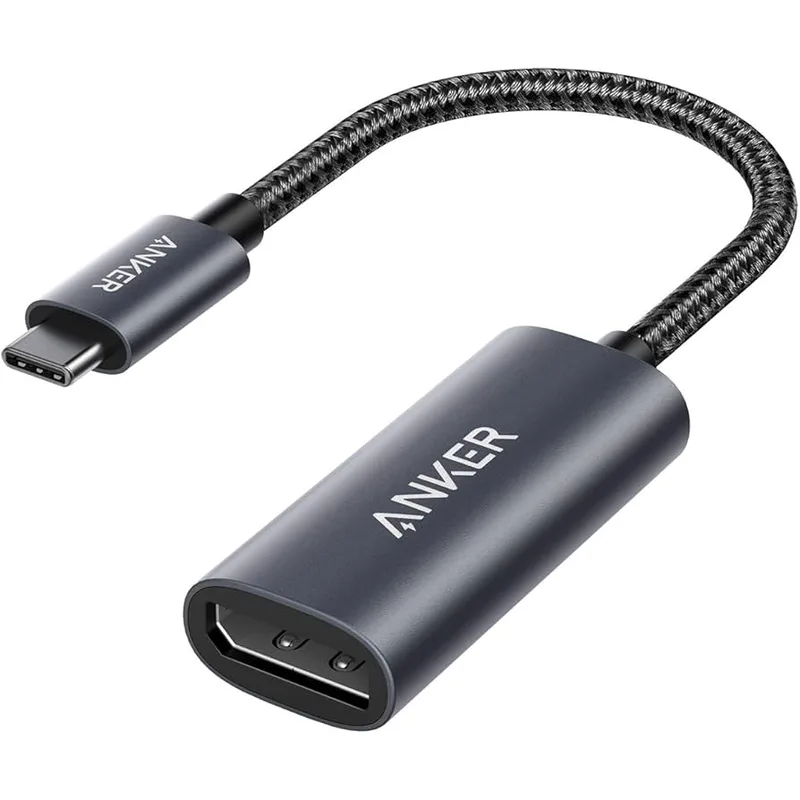
Anker USB-C to DisplayPort Adapter
Pros
- 4K@60Hz output from a USB-C or Thunderbolt port handles any monitor up to 4K at full 60Hz, without the bandwidth limits cheaper USB-C-to-HDMI adapters introduce at 4K
- Aluminum housing prevents thermal buildup that degrades cheaper plastic adapters after months of sustained use
- Works with any DisplayPort monitor using a standard DP cable — one adapter, one cable, done; no driver installation on macOS or Windows 11
- Compatible with Thunderbolt 3/4 on MacBook Pro and Air and Thunderbolt-equipped Windows laptops
Cons
- Handles one display only — a second monitor still requires another USB-C port or a dock with multiple video outputs
- No cable included — a DisplayPort cable between adapter and monitor is a separate purchase if you don't already have one
- On M1 and M2 MacBook Air and 13-inch MacBook Pro, macOS limits external display output to one monitor regardless of adapter — an Apple platform limitation, not a product defect
For Windows laptops or Thunderbolt-capable Macs, one of these per DisplayPort monitor is the cleanest connection. M1 or M2 MacBook Air users who need two external displays need a different path — a dock with a DisplayLink chip (the Plugable UD-6950H at ~$100 is the standard workaround) drives the second screen through software rendering rather than a native display controller.
Best for: Any laptop user with a Thunderbolt 3/4 or USB-C port connecting to a DisplayPort monitor.
Skip if: You’re on M1/M2 MacBook Air running two external displays — this adapter alone won’t overcome Apple’s native single-display limit on those machines.
Product Comparison
| Component | Option | Price | Best For |
|---|---|---|---|
| Monitor (matched pair) | Dell P2425H | $140-$170 each | Budget dual setup, matched screens |
| Monitor arm (budget) | VIVO STAND-V002 | $29-$39 | Fixed-position desks |
| Monitor arm (premium) | Ergotron LX Dual | $175-$215 | Daily repositioning, clean cable routing |
| Laptop adapter | Anker USB-C to DP | $20-$28 | Thunderbolt/USB-C laptops |
| MacBook Air M1/M2 dock | Plugable UD-6950H | ~$100 | Bypassing Apple’s one-display limit |
Buying Guide: What Actually Matters
Matching monitors vs. mixing sizes
Matched pairs are the easiest starting point. Identical resolution, brightness, and color profiles make either screen equally comfortable for extended sessions. Mismatched monitors — different resolutions or panel types side by side — create a perceptible quality difference that becomes a daily distraction.
If you already own one monitor and want to add a second, match in this order:
- Resolution — same native resolution matters more than identical brand
- Panel type — IPS with IPS; don’t mix IPS and VA
- Size — within one inch of each other
Arms vs. stands
Factory monitor stands eat 8-12 inches of desk depth each and often lack enough height range for a proper ergonomic position. Monitor arms solve both. The VIVO is right for fixed setups. The Ergotron LX is the call when daily repositioning matters.
When you need a dock
If your laptop has only one video output port, a Thunderbolt dock adds multiple display outputs from one cable. The CalDigit TS4 (covered in our Thunderbolt 4 docks guide) handles dual 4K displays through a single Thunderbolt 4 connection with full port expansion. The Plugable UD-6950H is the specific solution for M1/M2 MacBook Air users needing two external displays.
1080p vs. 1440p for the second screen
For a dedicated secondary display showing email, Slack, browser tabs, and reference material, 1080p on a 24-inch panel is adequate and significantly cheaper. If you do real work on both screens equally, match the resolution to your primary monitor.
FAQ
Can I set up dual monitors with just HDMI?
Yes, as long as your computer has two HDMI outputs or you use a dock with two HDMI ports. A single HDMI port connected to a splitter does not work — splitters clone one signal to two screens, producing identical content on both displays. An extended dual monitor setup requires two independent video outputs.
Does dual monitors require a more powerful GPU?
For office work — documents, browsers, video calls — any integrated GPU in a modern laptop or desktop handles dual 1080p monitors without issue. Dual 4K at 60Hz needs more bandwidth, and gaming across two screens requires a dedicated GPU. Standard remote work does not need a GPU upgrade.
Why is my second monitor showing as the wrong display?
Open Display Settings (Windows) or Displays (macOS) and check the monitor arrangement. Drag the monitor rectangles to match your physical desk layout — the OS has no way to know which screen is physically left or right without you telling it. Also confirm the correct monitor is set as the primary display.
Can I run dual monitors on an M-series MacBook Air?
M1 and M2 MacBook Air support one external display natively. Two external displays require either a dock with a DisplayLink chip (Plugable UD-6950H) or using the built-in Retina display as the second screen in lid-open mode. The M3 and M4 MacBook Air support two external displays natively without any DisplayLink workaround.
What resolution should I use for a 24-inch second monitor?
For a 24-inch display, 1080p (1920×1080) is standard. Text is legible at normal desk distances and the price difference versus 1440p is meaningful. If pairing it with a 1440p or 4K primary, consider 1440p for the second screen — the visual consistency across both panels is noticeable on long work sessions.
Do I need matching refresh rates on both monitors?
No. Windows and macOS handle different refresh rates independently per display. A 100Hz office monitor and a 60Hz secondary screen work fine side by side. Each display runs at its own rated rate.
Conclusion
A dual monitor setup doesn’t require expensive gear to function well. Two matched budget monitors, a VIVO stand, the right cables, and fifteen minutes with display settings gets you a working extended workspace for $350 or less.
The decisions that actually matter: Monitor choice is what you look at for hours — two Dell P2425H units give you matched IPS panels with full stand adjustments at a price where buying a pair makes sense. Arms vs. stands is a daily quality-of-life call — fixed position? The VIVO does the job for $35. Daily adjustments? The Ergotron LX pays for itself in convenience within the first month.
Get cables right first. Configure display settings second. Then decide whether ergonomics justify a stand upgrade. That order keeps the setup from becoming unnecessarily complicated.
Detailed Reviews
Dell P2425H 24-Inch FHD Monitor
Pros
- IPS panel with anti-glare coating delivers consistent color from any desk angle — no washout when you tilt or view from the side in side-by-side configurations
- 100Hz refresh rate makes document scrolling and window dragging noticeably cleaner than the 60Hz panels most office monitors shipped with two years ago
- Height, tilt, swivel, and pivot all adjust on the stock stand — full ergonomic dial-in before deciding whether a monitor arm is worth adding
- DisplayPort 1.4 output enables daisy-chaining on capable setups and carries the full 1080p signal at 100Hz, more reliable than HDMI for dual-monitor laptop configurations
- Buying two for a matched pair costs $280-$340 total — well under a single premium ultrawide, with two independently adjustable panels
Cons
- 1080p on a 24-inch panel shows its pixel density limits compared to 1440p at the same size — text looks noticeably softer for all-day reading of documents or code
- Built-in USB hub is USB-A only with no USB-C port — a separate adapter or dock is still required for laptops that charge via USB-C
- No USB-C video input — connecting a USB-C-only laptop requires an adapter, adding a link to the cable chain for anyone expecting a single-cable desk
VIVO Dual Monitor Desk Mount Stand
Pros
- Under $40 for a dual monitor arm removes both monitors from their factory stands, reclaims 8-12 inches of desk depth per display, and raises screens to proper eye level
- Heavy duty steel construction holds up at full extension over years of daily use — no wobble or creep when loaded with two monitors within weight spec
- C-clamp and grommet mounting both included — C-clamp installs in five minutes, grommet mount works for desks with existing cable holes or thick surfaces clamps cannot grip
- Built-in cable routing channels keep power and display cables organized between monitor and desk surface
Cons
- Fixed-joint arms require a hex key to reposition — not a smooth one-hand push like gas-spring arms; monitors stay where you set them until you loosen the bolts
- Maximum 27-inch monitor support adequate for most setups, but weight rating drops for heavier monitors above 20 lbs — verify your specific monitor weight before ordering
- At full extension with two heavier monitors, lighter desks experience more surface flex than with premium arms that distribute load better
Ergotron LX Dual Monitor Arm
Pros
- Constant Force friction mechanism holds both monitors exactly where you place them without tools — lift, angle, and rotate each arm independently and it stays, useful when adjusting for glare or reframing a webcam mid-call
- Internal cable channels route all display cables through the arm housing — nothing visible between monitor and desk, the main reason this costs three times more than budget alternatives
- Full six-axis movement per arm (tilt, swivel, rotate, extend/retract) supports portrait-landscape mixed setups, angled primary/secondary arrangements, or matched side-by-side at any height
- Friction joints maintain calibrated resistance over years of daily repositioning — budget arms loosen progressively over months of use, this one holds
Cons
- At $175-$215, this arm costs more than many budget monitors it will hold — buying two budget monitors plus this arm can consume the entire dual monitor budget
- 27-inch maximum per arm is a hard limit — will not reliably hold 32-inch monitors; Ergotron's LX Vertical Stacking Arm handles larger displays
- Installation involves desk clamping and routing cables through the arm — first-time setup takes 20-30 minutes versus 5 minutes for a simple stand swap
Anker USB-C to DisplayPort Adapter
Pros
- 4K@60Hz output from a USB-C or Thunderbolt port handles any monitor up to 4K at full 60Hz, without the bandwidth limits cheaper USB-C-to-HDMI adapters introduce at 4K
- Aluminum housing prevents thermal buildup that degrades cheaper plastic adapters after months of sustained use
- Works with any DisplayPort monitor using a standard DP cable — one adapter, one cable, done; no driver installation on macOS or Windows 11
- Compatible with Thunderbolt 3/4 on MacBook Pro and Air and Thunderbolt-equipped Windows laptops
Cons
- Handles one display only — a second monitor still requires another USB-C port or a dock with multiple video outputs
- No cable included — a DisplayPort cable between adapter and monitor is a separate purchase if you don't already have one
- On M1 and M2 MacBook Air and 13-inch MacBook Pro, macOS limits external display output to one monitor regardless of adapter — an Apple platform limitation, not a product defect